Selecting The Perfect Oboe Reed
Posted by Chelsea Kanicsar, DMA (edited by Clair Cangialosi, DMA) on Nov 16th 2026
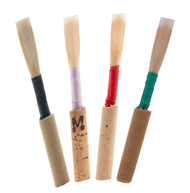
What does it mean to have the perfect oboe reed? Reeds perfect for a professional orchestral musician can vary significantly from what a young, beginning oboist needs. So how do we choose the perfect reed? How do we contend with the numerous factors that influence oboe reeds such as weather, elevation, player development, and so much more? Today, we will explore basic concepts that can help you go from confused to confident when choosing a reed in a matter of minutes.
Table of Contents
- Assessing The Crow
- Assessing Response & The Tip Opening
- Assessing Pitch
- Assessing Tone
- Conclusion
Assessing The Crow
To begin, we need to talk about crows. No, not the birds in the sky! We are talking about the noises our reeds make that can help us pinpoint the pros and cons of each reed.
To start, let’s discuss how to properly crow a reed. We want to put the reed into our mouth until our lips are making contact with the thread. From there, we begin by blowing as little air as possible through the reed and gradually increasing the speed and volume until we reach the maximum rattle possible. The reason for this is to influence the vibrations of the reed as little as we can and to get a clear understanding of what the reed does well or poorly on its own. We can force a reed to do a lot of things, but we want to ensure we are letting the reed tell us how it will help or hinder us when playing.
Assessing Response & the Tip Opening
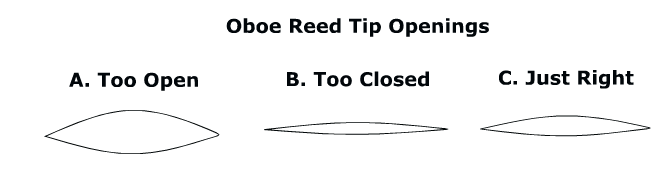
So, what are we looking for when we crow a reed? The first sound a reed makes should speak with very little air or resistance. It should not feel forced. If it takes too much air to make a sound or too much resistance, this means that the tip of the reed is too thick or the opening is overly closed or open. Oftentimes, if the reedmaker does not scrape all the way onto the plaque–which is a small metal or wooden tool that helps support an oboe reed while scraping–a tiny ridge of thicker cane remains on the tip which prevents the start of the vibrations.
On the other hand, if the opening is too large, it will require too much air and biting to play properly (see figure 1).
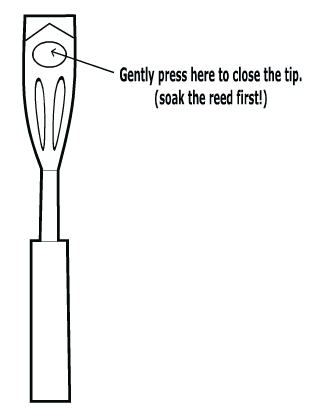
If you are uncomfortable with adjusting your reeds yet, try a different reed for the day until you can meet with an oboist who can help. If you must adjust the opening in an emergency or you are comfortable with adjusting your reeds, you can employ the soak and squish method: (see figure 2)
- Before doing anything to the reed, soak it properly so the reed does not crack.
- After soaking the reed, you will be able to gently massage the heart area with your fingers until the opening begins to close towards a usable size. If this is not enough, you can also massage a bit in the back as well.
 Tip: Be very careful if using the soak and squish method - do not force it too quickly or handle it too roughly or else your reed may not survive!
Assessing Pitch
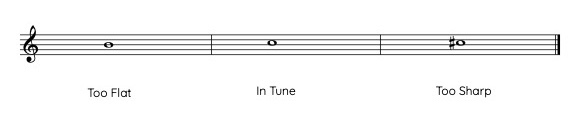
Now that we can select a reed that responds well, which is always a crucial first step, we move into our second main category: pitch. For many oboists, the crow of an oboe reed will be approximately a C. The amount of which this pitch varies is tied to the needs of an oboist. Players who often play sharp may find that reeds crowing a slightly flat C play better in tune than a reed that crows a perfectly in tune C. Others who use very little embouchure and tend to play flat may find that playing on a reed that crows a sharp C works better for their needs. If the note strays as low as a B or as high as a C#, this typically means we need to choose a different reed. (see figure 3)
Assessing tone
The last thing we investigate is the tone. This cannot be stressed enough: if a reed doesn’t respond well or play in tune, select another reed or adjust it if you can. Tone is irrelevant if the reed doesn’t work.
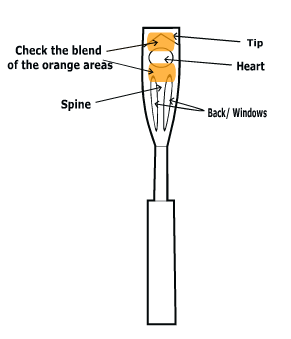
Another thing to note is that pitch and tone are related. If the reed plays comfortably in tune and responds well, the tone generally reflects this. That being said, there are times when adjustments will be necessary. Common places to examine when investigating tone are the back or the windows (if you use this technique) and places where the reed transitions from one part of the reed to another (i.e., the tip to the heart and the heart to the back). See figure 4 at right.
Conclusion
There are a lot of factors to consider when choosing the perfect reed for the day, or even for a single piece of music. Whenever you are making this decision, however, remember: first, response; second, pitch; and finally, tone. Learn what good and undesirable crows sound like and use this to your advantage. No matter what happens, don’t forget that we and your teachers are here to help. If you have questions, contact us through our website!