Hodge Oboe and English Horn Gouging Machine Instructions
Posted by Ann Hodge on Mar 31st 2018
Hodge Gouger Instruction
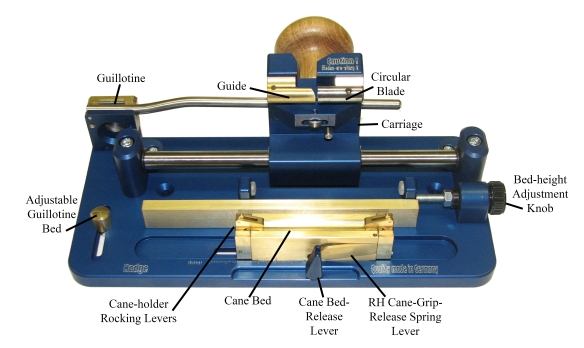
Placing the cane on the bed - Pull the Cane-holder Rocking Levers back from the top so that they stay back. Press the RH Cane-Gripping Release Spring Lever and center the cane on the bed while pressing the lever. The cane should extend slightly past the end of the bed so that the Cane-Gripper will grip the cane when released. Pull back on the Cane-holder Rocking Levers from the front and let go to release them back down onto the cane. Repeat to take the cane out of the bed.
Gouging the cane - Place the carriage down on the bed. Pull the carriage all the way back to the right. Press down with a medium pressure and push the carriage forward to the left until it stops. Then pull back and do it again. Usually about 5 passes is enough to get all the cane off. Then take the cane out and flip it around and do one more pass to get the last sliver.
Adjusting the cane shaving thickness - Use the small Allen wrench to turn the screw on the end of the Guide. A very slight turn to the left (away from you) will raise the guide up making a thicker shaving. Turn it slightly to the right (toward you) to make the shaving thinner.
Adjusting the Gouge Thickness - Turn the Cane Bed-Release Lever down to the left to loosen the bed. Then turn the Bed-height Adjustment Knob to the right (away from you) to raise the bed and make the gouge thicker. Turn the knob to the left (toward you) to lower the bed for a thinner gouge. When the cane gouge is measuring the desired thickness (.58-.60 mm), don’t forget to raise the Bed-Release Lever back up to secure the bed.
Adjusting the Guillotine Length - Turn the machine over and loosen the screw on the bottom of the guillotine bed. Then slide the bed to make it the length desired.
Changing the blade - Unscrew and take off the handle on the top of the carriage to make this easier (optional). Using the middle Allen wrench, unscrew the screw on the top right side of the carriage over the blade. Take it out and then carefully pull down on the circular blade. Be very careful to keep your fingers away from the sharp part of the blade. If it doesn’t come out easily, you can use a very small screw driver to ply it out, but again, be very careful of the blade. Turn the blade to an unused portion and insert back into the blade holder, line up the screw hole with the screw, and tighten screw. Follow the previous instructions for adjusting the shaving thickness and gouge thickness, as it will need adjusting when a new blade is put on.