"Handing" a Double Hollow Ground Reed Knife
Posted by Tim Hodge, edited by Clair Cangialosi, DMA on Jul 30th 2025
Did you know that reed knives can be either right or left-handed?
Beveled knives and most double hollow ground knives will specify that they are made for either right or left-handed users- these are ready to go right out of the box!
However, certain double hollow ground knives, specifically Razor Edge Knives, need to be “handed,” or set up prior to use. This ensures they will scrape correctly depending whether the user is right or left-handed.
This post is a primer on handing double hollow ground knives. We recommend consulting the Jende Book of Sharpening Double Hollow Ground Reed Knives (as well as a teacher, colleague, or other reedmakers) for more information beyond this article.
Table of Contents
- Anatomy of the Knife Blade
- Tools and Materials Needed for Handing a Knife
- The Nickel-Dime Sharpening Method
- Initial Knife Shaping Steps
- Shaping the relief
- Forming the front and back faces
- Forming the burr
- Conclusion and Additional Resources
- Works Cited
Anatomy Of The Knife Blade
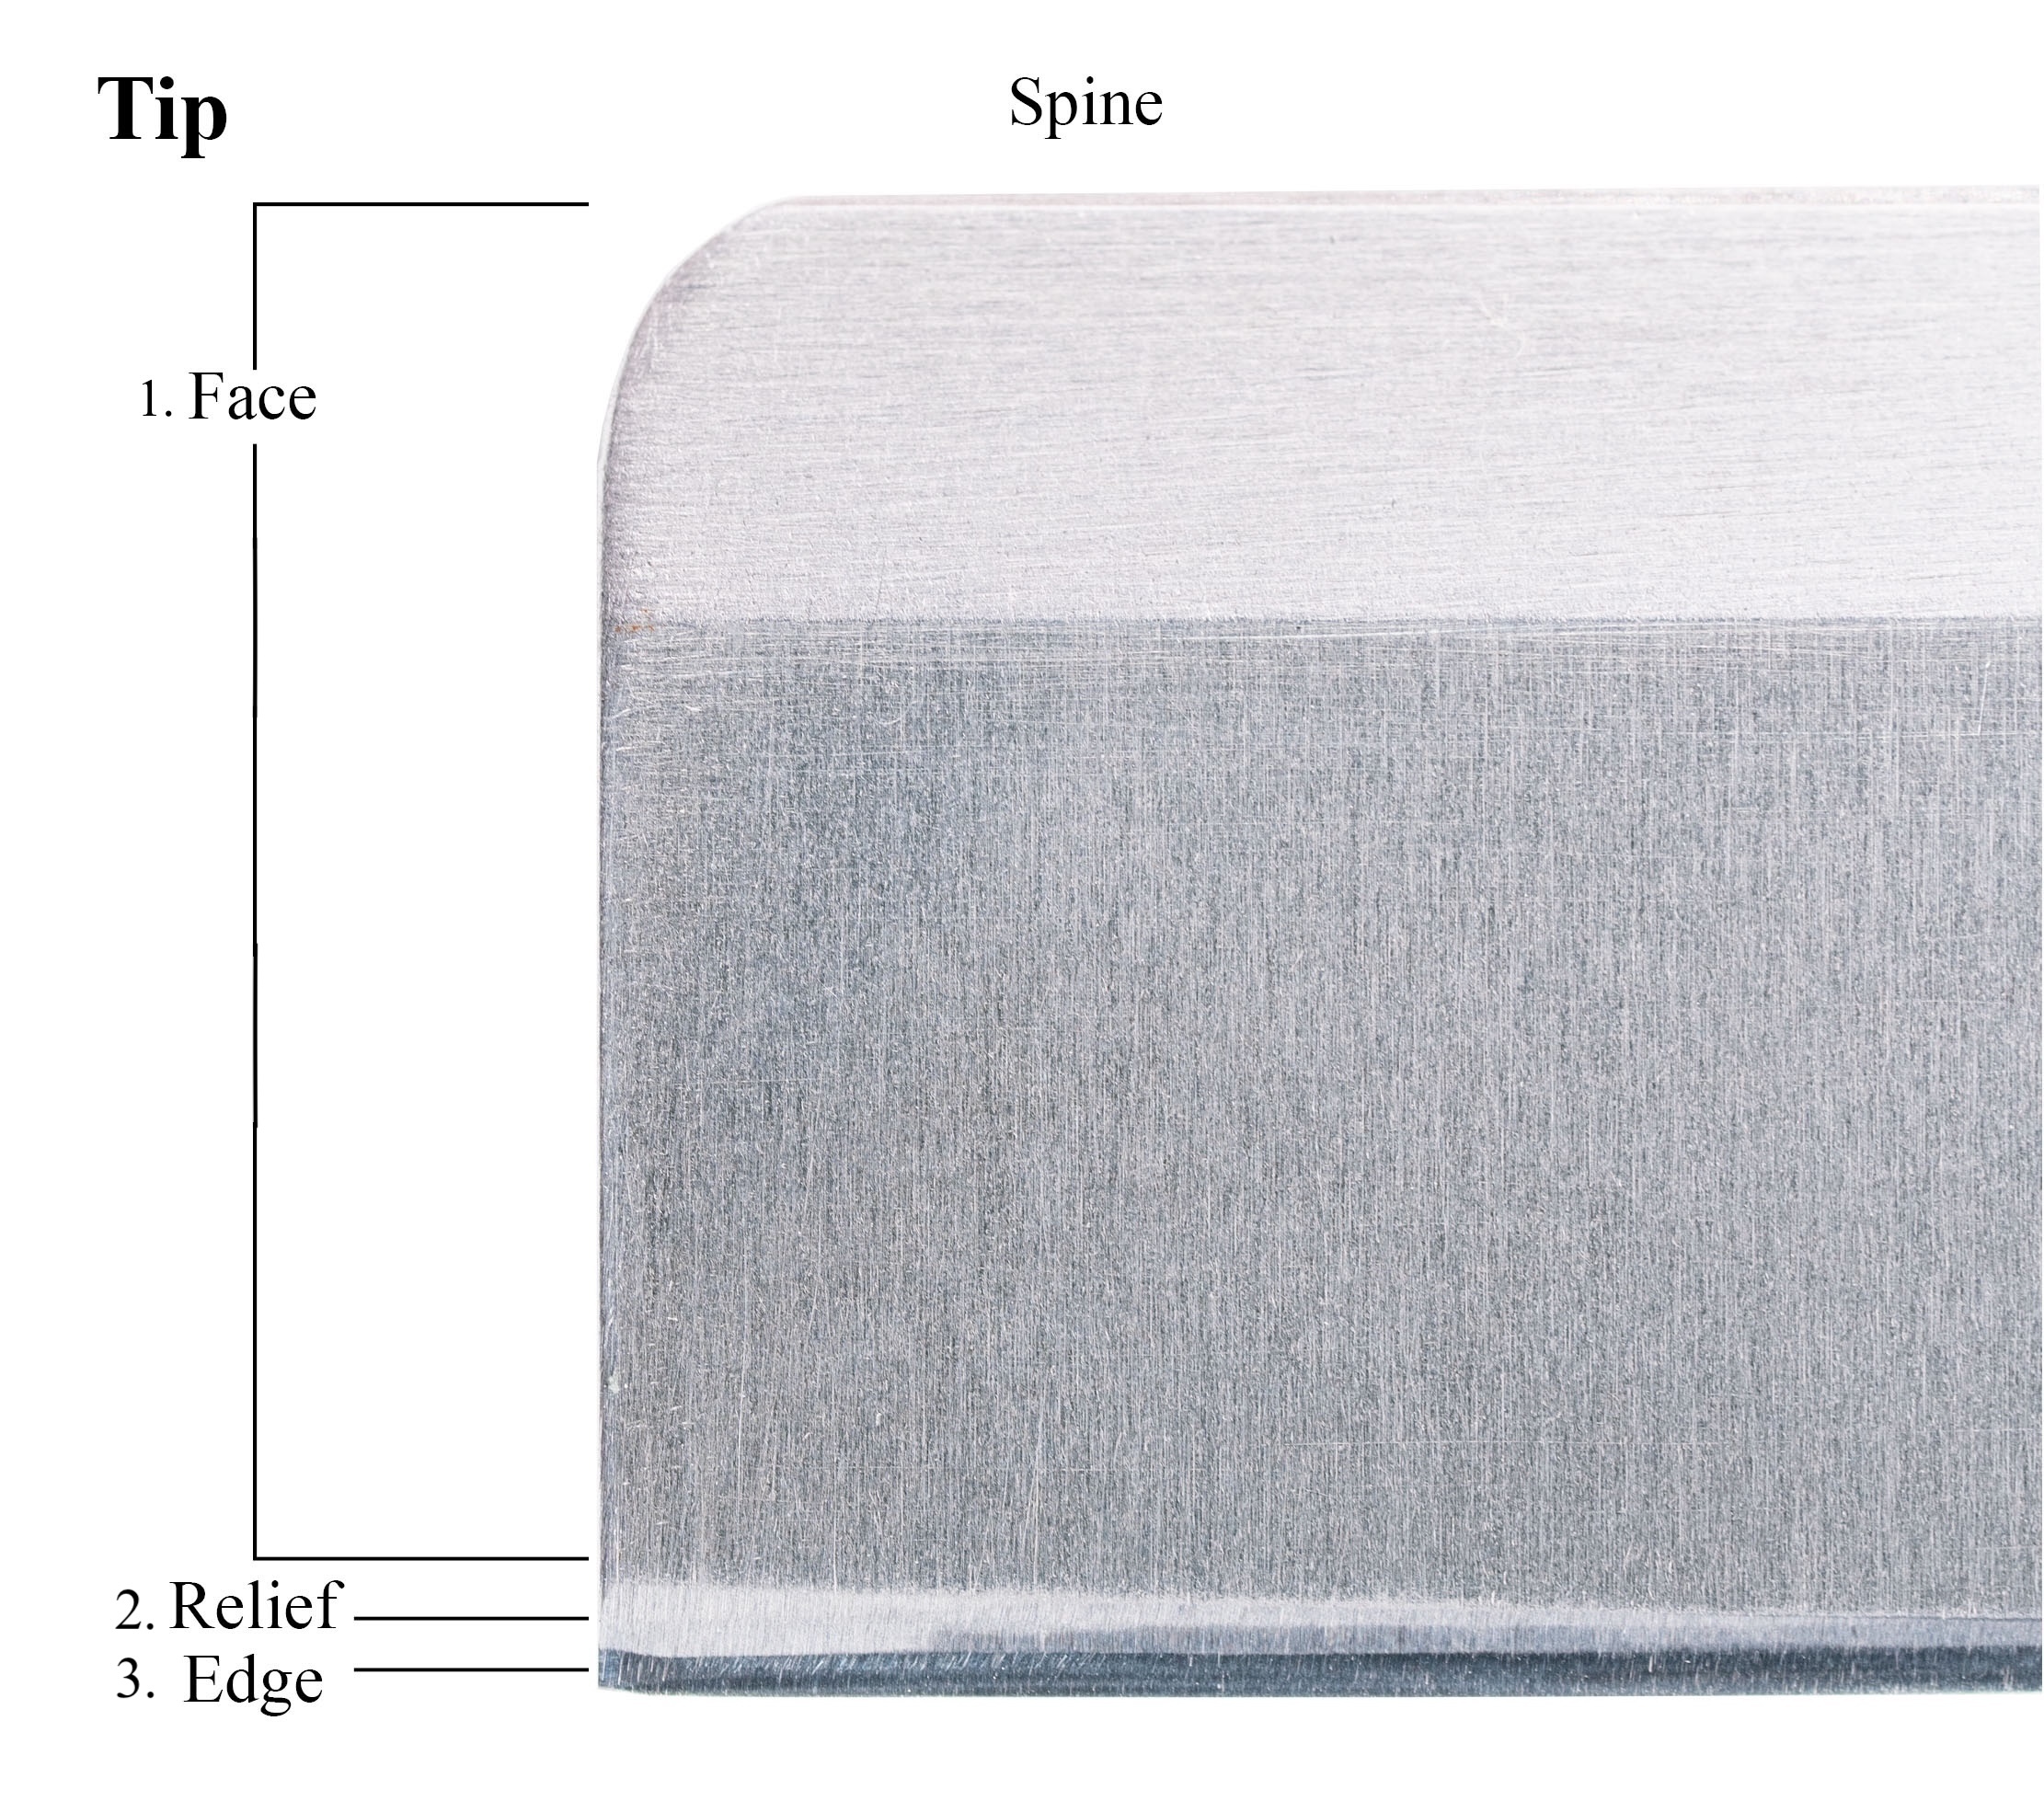
- Face: The sides of the blade. The front face is positioned towards the reed, while the back face is positioned towards the user
- Relief: An area on the back face of the blade, just above the edge, which contributes to the ease (or difficulty) of sharpening and scraping.
- The Edge: The sharp end of the blade, used to scrape
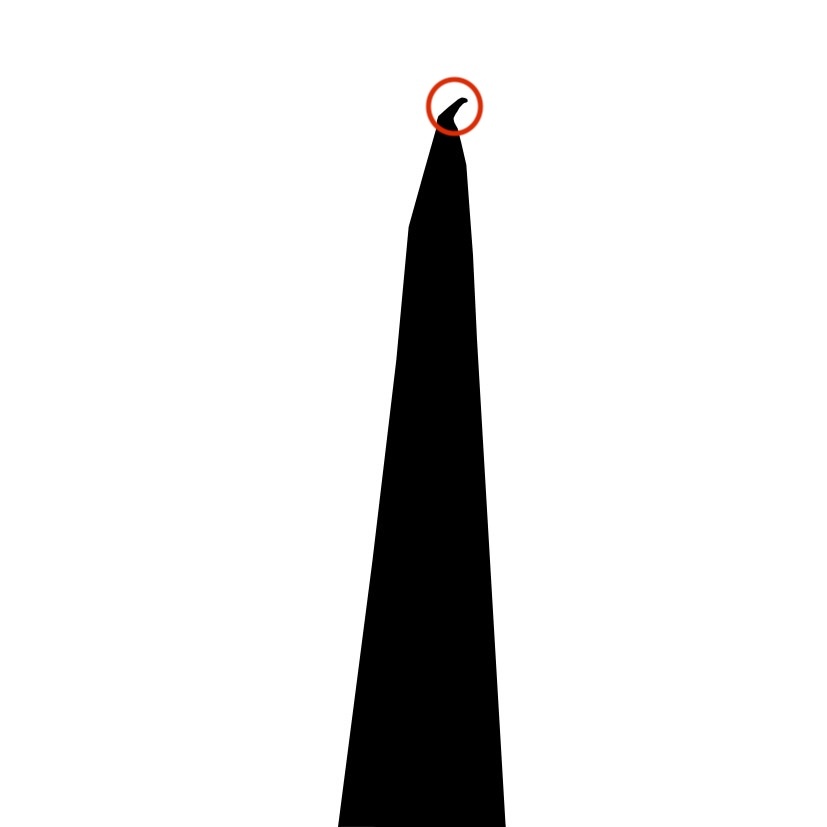
Additionally, double hollow ground knives have a burr at the very end of the edge, which allows the knife to scrape horizontally across the surface of a reed. The burr is so tiny that it is easier to feel than see. Figure 2 shows an enlarged view of a knife edge with the burr circled in red. The relief, edge, and burr will all be added to the knife through the shaping process.
Tools and Materials
The tools and materials needed to set up your new reed knife are:
- Course grit sharpening stones- Grits: #120, #220, #320, or #500
- A nickel and a dime (or two other coins of slightly different height), for setting the angle of the knife on the stone
- Your new knife
The Nickel-Dime Sharpening Method
In his book, The Jende Book of Sharpening, Tom Blodgett recommends the nickel-dime sharpening method to consistently create the correct angles of the knife to the stone when sharpening. He notes that it is not necessary to limit this to US currency, as long as a lower angle (thinner coin) and a higher angle (thicker coin) can be achieved. (Blodgett, 8)
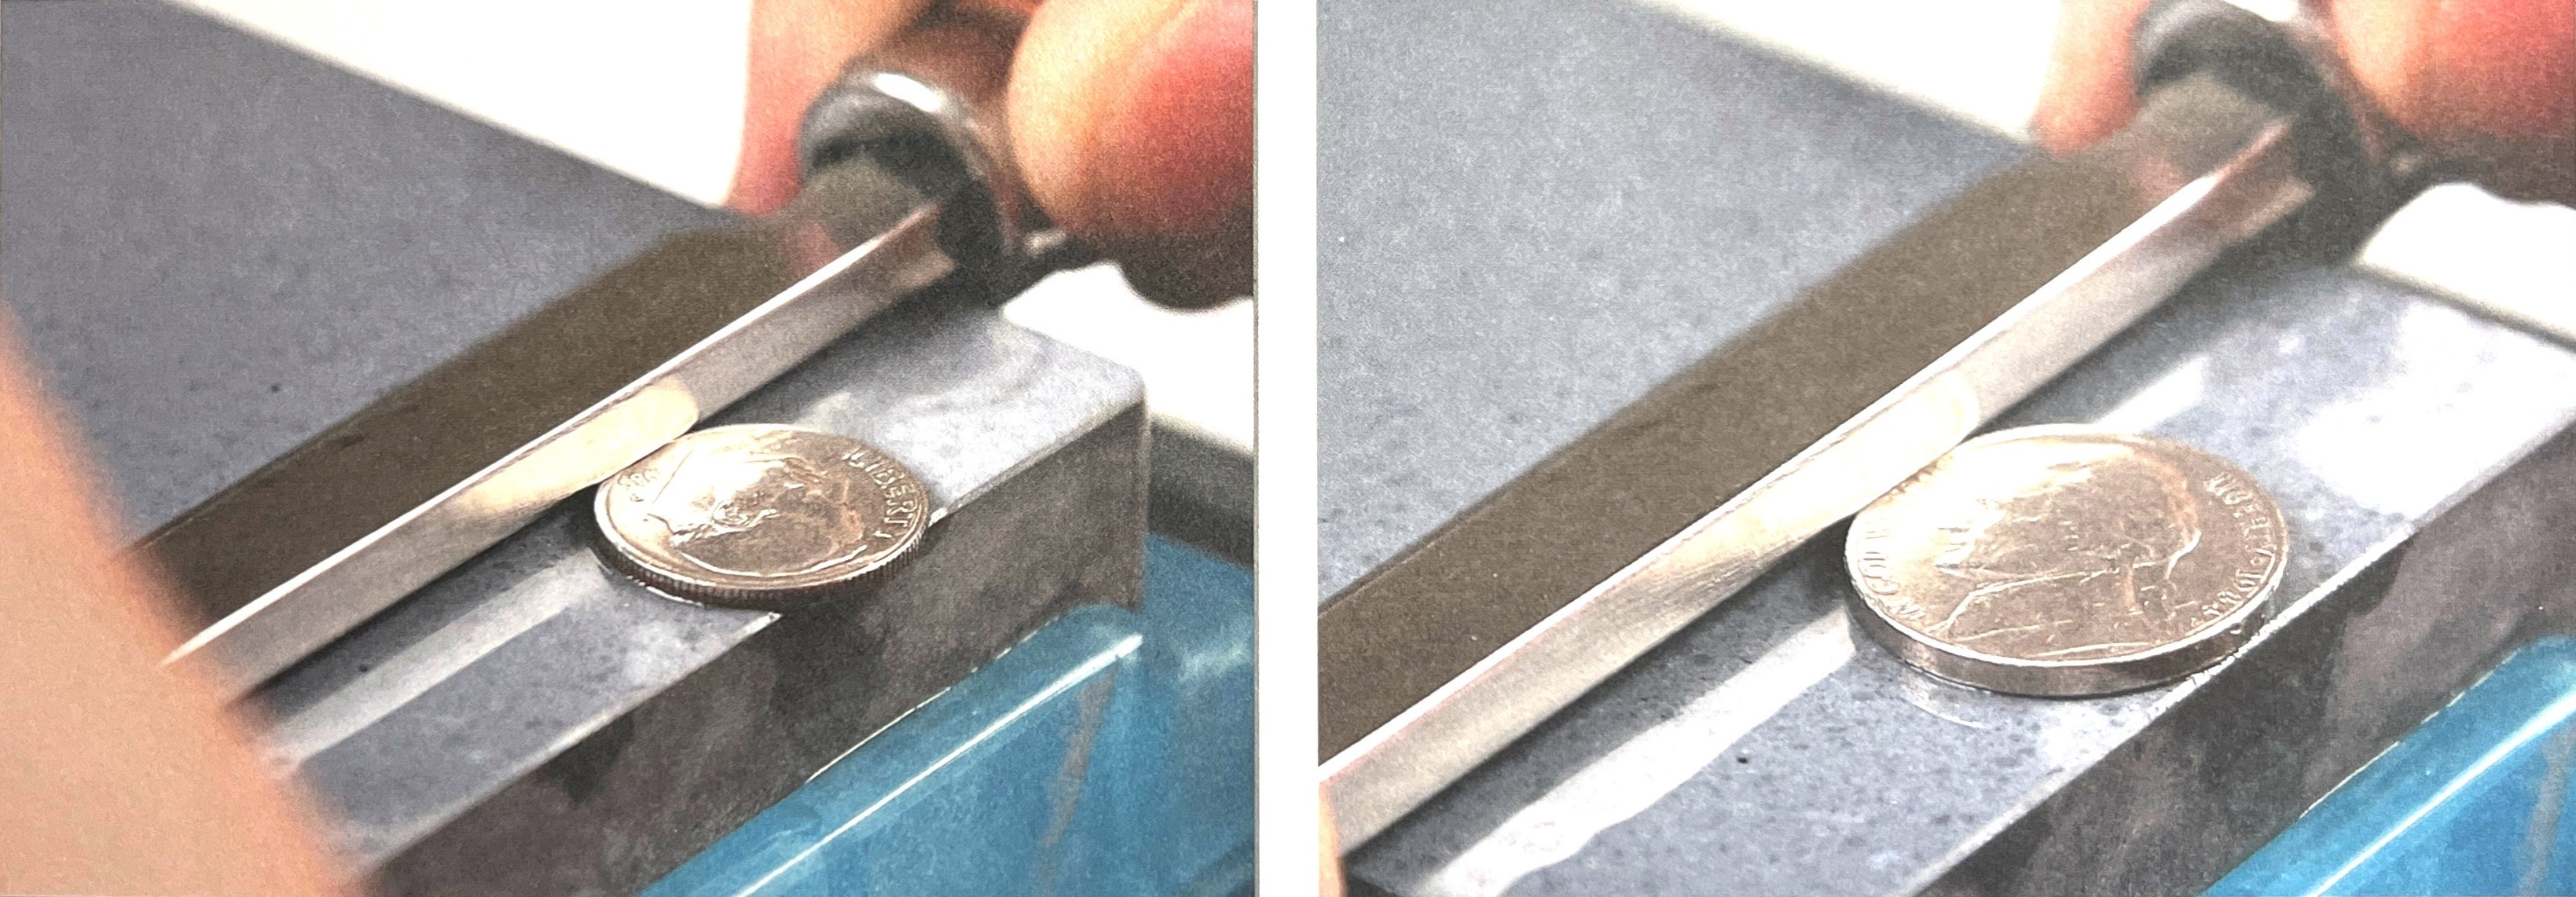
To find the correct starting position using the coins, place the desired coin on the sharpening stone. Place the knife in front or behind the coin on the stone, then raise the spine of the knife onto the lip of the coin. Maintain this angle as you pass the knife over the stone. The coin should stay stationary. It may be helpful to reset to the starting position after each pass. (Blodgett, 16)
Figure 3, taken from the Jende sharpening book, shows a nickel (right) and a dime (left) being used to set the correct knife angle.
Initial Knife Shaping Steps
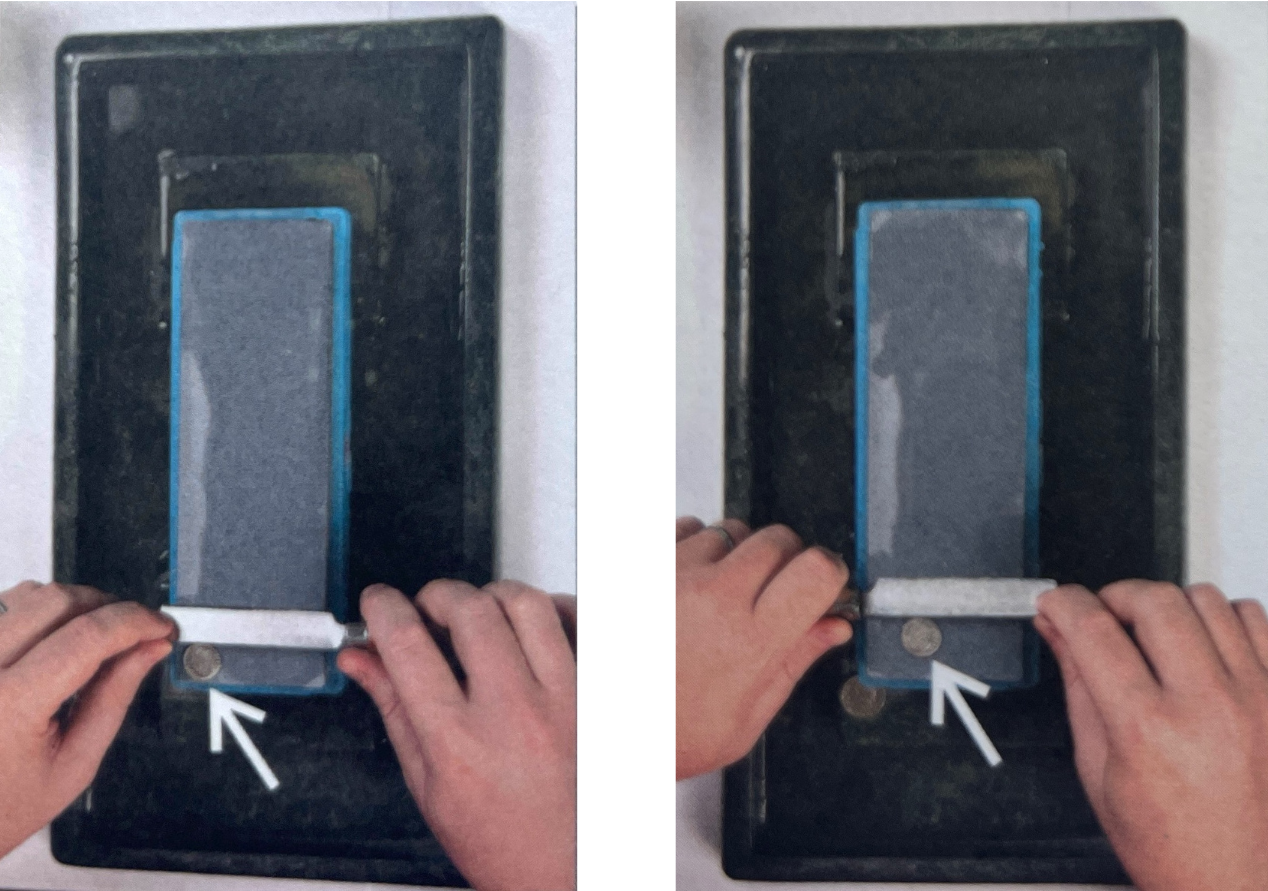
Start each step of this process by holding the knife in the hand that you intend to use while scraping a reed. If you scrape right-handed, hold the knife in your right hand. If you are left-handed, hold the knife in your left hand. Note that this may be the same or different as the hand you use for writing and other such activities. Figure 4 shows an example of holding the knife blade facing away from the user in both the right and left hand.
1. Shaping the Relief
The purpose of forming the relief is to thin out the blade, allowing for the thinnest possible edge angle. This makes scraping and subsequent sharpenings easier, and prolongs the life of the knife.
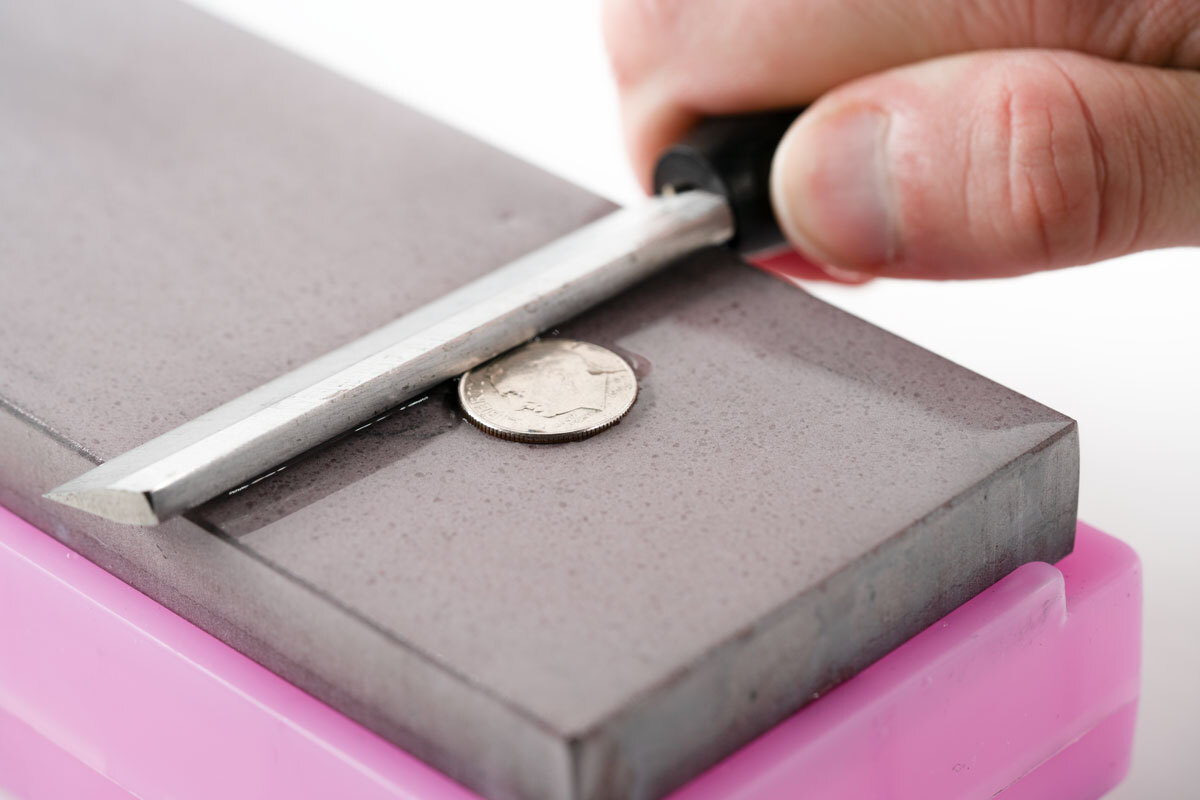
To set up the relief, place the knife on the sharpening stone with the blade facing away from you (the back face should be touching the stone). Lift the spine to the height of a dime to find the correct angle of the knife to the stone (see figure 5). While maintaining that angle, slowly move the knife towards the other side of the stone. Continue until you can feel a burr start to form. (Blodgett, 22)
 Tip: Use an edge tester or your ring finger to feel for a saw-tooth like ridge on the front face of the blade.
2. Forming the Back Edge
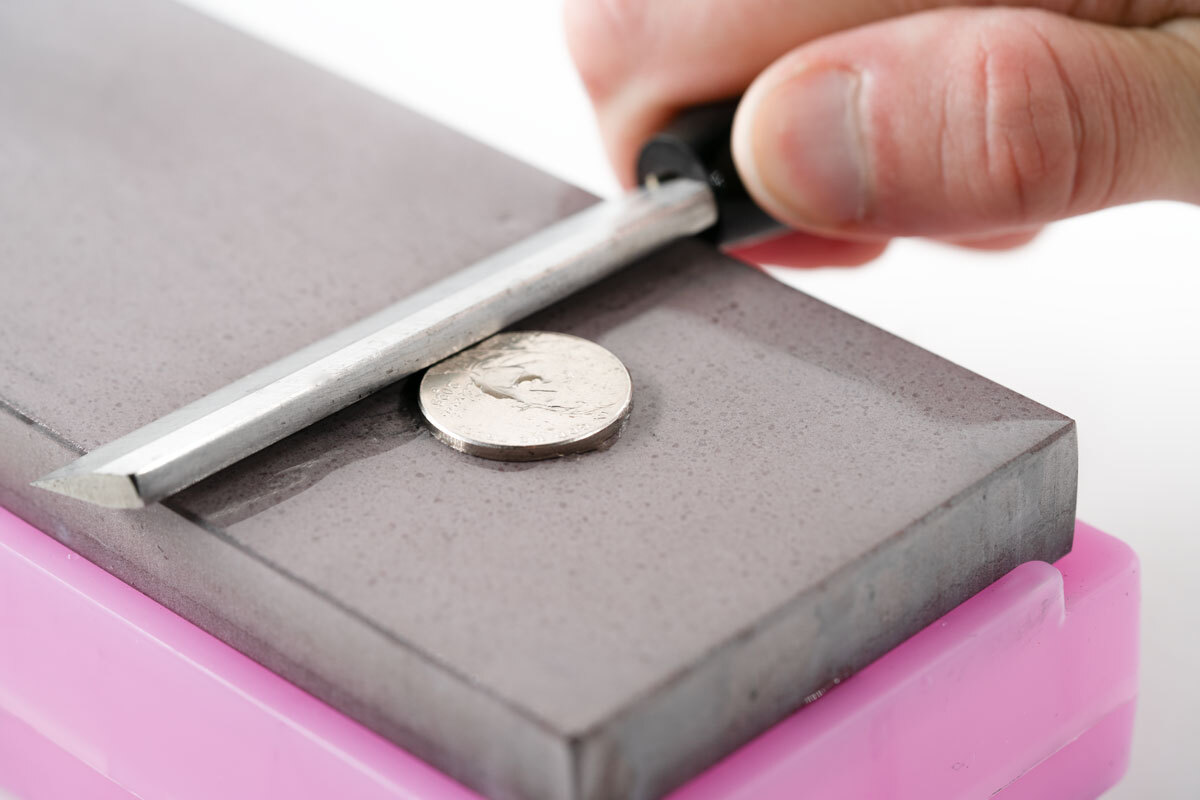
The angle of the back edge is formed by lifting the spine off the stone the height of a nickel. This more obtuse angle adds strength and support to help the knife hold its edge longer. (Blodgett, 22)
Again, place the back face of the knife on the sharpening stone with the blade facing away from your body. Lift the spine to the height of a nickel (see figure 6). Sharpen as in step 1 until a burr forms on the top side of the blade.
3. Forming the Front Edge
The front edge is created by raising the knife off the stone the height of a dime. This angle offsets the angle of the back face, allowing the knife to scrape evenly across the surface of a reed. (Blodgett, 22) Figure 7 shows how the nickel and dime angles are combined to create various edge shapes.

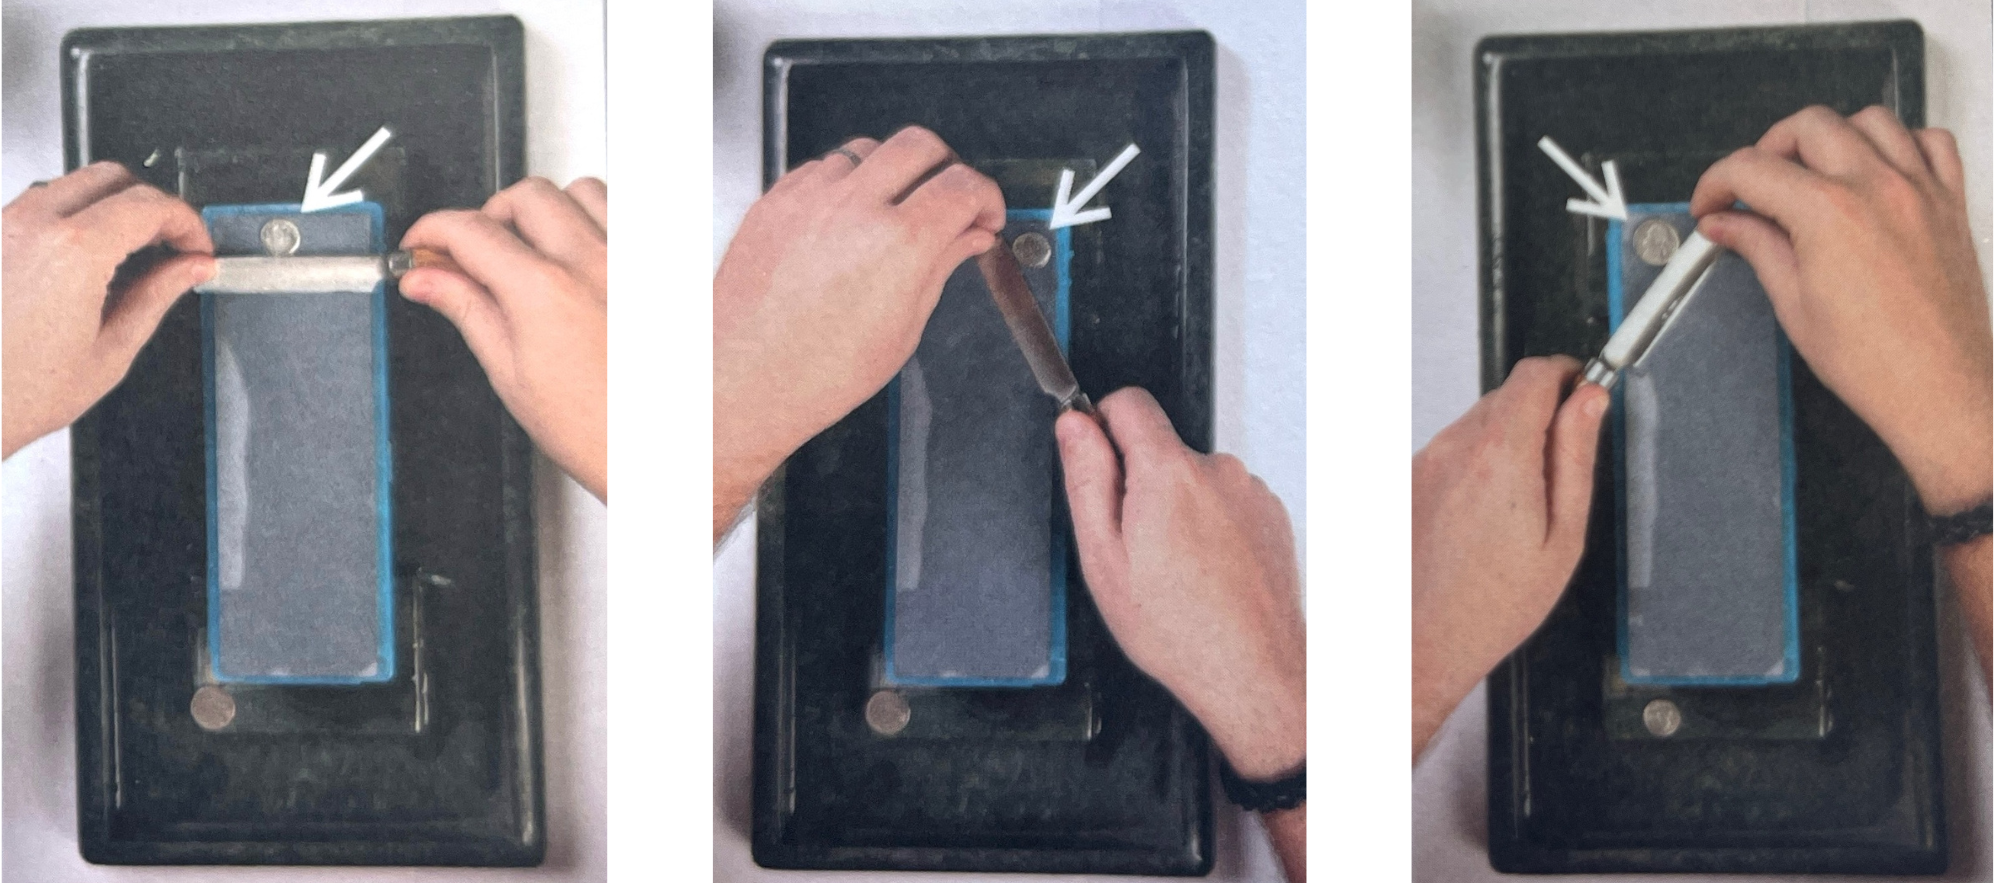
Place the knife on the stone with the blade facing towards your body. Figure 8 shows right and left-handed starting positions (note that the middle and left images below are both acceptable for right-handed users). The front face should be touching the stone. Lift the spine the height of a dime. Sharpen as in steps one and two until a burr forms on the top side of the blade.
4. Setting the Burr
Although a burr should have begun to form in steps one through three, now we need to remove excess burr from the back face (leaving the burr facing towards the front face). This positions the burr on the correct side of the blade. (Blodgett, 23)
Place the knife on the stone facing away from your body, as in steps one and two. Lift the knife off the stone to the height of a nickel. Make a single forward pass across the stone. Be sure that the entire edge comes into contact with the stone, especially the tip.
Conclusion and Additional Resources
Congratulations! After performing the four steps above, your knife will be correctly set up for either right or left-handed use. The process above can be repeated with medium and fine grit stones to maintain a sharp edge.
For a left-handed tutorial, see the video below:
Questions? Give us a call or contact us through our website. We’re happy to help you!
Works Cited
Blodgett, B. Thomas. Edge Geometry. In The Jende Book of Sharpening. USA: Jende Industries, LLC, 2008, 8.
Blodgett, B. Thomas. Edge Geometry. In The Jende Book of Sharpening. USA: Jende Industries, LLC, 2008, 9, fig. 3B-D.
Blodgett, B. Thomas. Edge Geometry. In The Jende Book of Sharpening. USA: Jende Industries, LLC, 2008, 16.
Blodgett, B. Thomas. Starting Position for Dime and Nickel Angles. In The Jende Book of Sharpening. USA: Jende Industries, LLC, 2008, 17, fig. 6H and 6J.
Blodgett, B. Thomas. The Jende Book of Sharpening. USA: Jende Industries, LLC, 2008. 22-23.

